Sunday, December 28, 2008

A Belated Christmas Present!


Scramble for your bazookas everybody, there's a new Tiger in town! The Tamiya Tiger is almost done! Reconnaissance reports show these blurry new pictures of this Tiger, probably preparing to storm the front lines in early 2009!

Saturday, December 13, 2008

Finishing the Tamiya Universal Carrier Mk.II: Pt VII


The final step to finishing my Universal Carrier was to weather. First, I made a wash out of Burnt Umber paint, (don't ask me what sort of paint/water ratio I used; I just poured a glob of paint into a cup and put some water in with it) and painted over the chassis with it. I let it dry for about 30 seconds and then wiped it off. The results were FANTASTIC!!! I then applied a wash of Light Avocado and painted over the decals to look like worn paint. I highly recommend this to anybody who wants to add extra realism. Also, I applied deep cuts to the paint and plastic and washed over them with Forest Fern, not with silver. After reading magazine articles and seeing multiple tanks up close, I learned that when a tank receives a cut or a chip, it doesn't immediately wear down to bare metal, but reveals a less faded version of the main base coat.
After that I added a coat of mud to the lower part of the vehicle. For this I used Tamiya's Weathering Master, (item 87079), and painted on the mud color. This is a very accurate and cheap way to give your model added realism. For the tracks, I simply applied a red-ish brown wash and put them on. This was fairly simple, but most of the time, you need a second set of hands.
Overall, this was a fantastic kit that I really enjoyed building as an early armour model.
***** 5/5 to Tamiya for such an excellent kit!

Saturday, December 6, 2008

Finishing the Tamiya Universal Carrier Mk.II: Pt VI


The most daunting task on the road to finishing my Universal Carrier was markings. Personally, I wanted to model my Carrier after the Universal Carrier of the Calgary Museum of the Regiments, the first one that I saw up close. I VERY CAREFULLY painted in the insignias on the front of the vehicle. This took multiple tries, having to redo the maple leaf on many occaisions, making this a fairly tedious process. Then I placed some decals from the kit, #'s T-252910 and carefully painted a "C" in front of the "T's" in order to make the vehicle Canadian. I then applied a wash of the base color to blend in the decals.

Sunday, November 23, 2008

Finishing the Tamiya Universal Carrier Mk.II: Pt V


After finishing the Jerry Cans and other accessories, I wanted to make the "lived in" feel to my model even more obvious so I went foraging through all of the extra parts given for this kit and decided to add one of the extra helmets. The only problem with this was that the inner part was far too small to be accurate a this scale so I took my Dremel tool to the inside and made it far deeper. I then took a piece of paper, cut it into a circle and glued strips of tin foil onto it to make helmet liner and straps. I painted the liner Tan and the outside of the helmet Forest Fern. I then added it into the driving compartment along with some ammo boxes.


Sunday, November 16, 2008

Finishing the Tamiya Universal Carrier Mk.II: Pt IV

After completing the Enfield rifles, I then went on to work on the Bren Guns. I painted the three of them with metallic black as a base coat, and then added a normal black wash to bring out the fantastic details on the guns. I then added Burnt Umber to the end and the handles. After that I painted all of the accessories, and when I say all, I mean ALL of the accessories, like backpacks, ammo pouches, Jerry Cans, Ration boxes, everything that a real wartime vehicle should have. The monotonous task didn't take too long when I used an assembly line idea, and painted one side of one Jerry can, Storage Box, or whatever, then cut off another and did the same. When I had finished all of them on one side, the first side would be dry and I could paint the others.

Sunday, November 9, 2008

Finishing the Tamiya Universal Carrier Mk.II: Pt III


The kit comes with two Lee Enfeild bolt action rifles, and both are supposed to sit neatly in the rifle rack in the middle of the vehicle, but I decided, since I chose mine to look like an operational vehicle, I decided to add a strap to one and place it in a corner of the Carrier. I took a normal sheet of Tin Foil and cut small, thin strips out of it, and attached it to the places on the rifle where they went on the real gun. I then painted the rifle Burnt Umber and the strap in Tan. The effect was extremely satisfying.


Sunday, November 2, 2008

Finishing the Tamiya Universal Carrier Mk.II: Pt II


After finishing painting the wheels, I found all of the parts that require cushions ( seats, back rests, etc.) To do this I started out with a coat of Burnt Umber and and created texture by "poking" ( the only word that I could think of to describe the hand motion...) the brush on the wet paint. I waited for it to dry, and then dry brushed on Roan Red and Country Maple paints. This gave a nice finish to the seats, giving them the perfect look of the real vehicle.

Next I painted the tools on the back of the carrier. The handles received a base coat of Roan Red and the metal parts storm cloud grey. While these were drying I applied a coat of Cashmere and Forest Fern to the fabric parts above. When the tools were dry, I painted the wood Country Maple and the metal a metalic black.


Saturday, October 25, 2008

Finishing the Tamiya Universal Carrier Mk. II: Part I


Well, I thought it was about time for another review [Being as the last one finished on April 5.... :P ] and luckily, I'm just about finished Tamiya's British Universal Carrier Mk II - Forced Recon( http://www.tamiyausa.com/product/item.php?product-id=35249 for more details) so I decided that I should explain how I worked on finishing the Carrier.


I started off by painting it Deco-Art's Americana Light Avocado paint. ( For a full line of Deco-Art Paints go to http://www.decoart.com/) I chose this color after many failed attempts to make my own shade, but this one was just about perfect. I painted the carrier in two parts; the main hull and then the front guard area. After painting the these I applyed black Deco-Art paint to the wheels. (For future reference; all paint that I use is Deco-Art, so I won't be stating the brand from now on.) I was exceptionally pleased with the result, because it really made the color of the vehicle appear darker.

Saturday, October 18, 2008

Tip of the Week

Don't let large tasks like zimmerit or individual track links intimidate you, they only take time but aren't that hard. Before I started on my Tiger's zimmerit, I was very intimidated, but it isn't overly hard; It just takes a lot of time. (Zimmerit's almost done... pics soon hopefully....)

Monday, September 22, 2008

Tip of the Week

Take a look around at your local dollar store. There can be all sorts of useful things that you would never know about if you didn't take a look. The only place where I get all of my paints, brushes, and multiple other useful items is at the nearest dollar store.

Saturday, September 13, 2008

Tip of the Week

Are you still painting your models with a brush or aerosol spray paint can? If so, buy a cheap airbrush and compressor. These simple tools may be quite expensive, but the results on your model are worth it.

Sunday, August 24, 2008

Tip of the Week

Use safety glasses!! I know that they're clunky and can be a pain, but would you rather be more comfortable and end up with your eyes glued open or have your vision and continue to build models? The choice is yours but I'll always choose the latter.

Tuesday, August 12, 2008

Tip of the Week

Sorry for the last wait. I was on holidays and not around a computer for the last while. But with holidays comes new models. The latest in this lineup are:

British Universal Carrier Forced Recon - Tamiya
A-10 Thunderbolt - Revell Monogram
F-18 Hornet - Revell
Decals for F-18 - Leading Edge Decals

and I got putty to apply zimmerit to my Tamiya Tiger, which by the way, is based after Michael Wittman's last vehicle. (Pics soon!!)

Anyways, now you're all wondering what the tip of the week is. This week's tip is to use ordinary tin foil and wire to detail your models. Tin foil can be bought at most grocery stores for a low price, and wire can be found at almost any hardware or craft store. You can use these two, inexpensive items to keep your models looking professional without the extra costs.

Wednesday, June 25, 2008

Tip of the Week

I'm so sorry to all of my readers that I haven't been on lately. I just haven't gotten around to it. Anyways, the tip of the week is to use wood putty rather than use expensive model putty to fill gaps. Wood filler can be bought at the average hardware or woodworking store. It's a quick, and inexpensive fix for a common problem.

Monday, May 19, 2008

Tip of the Week

The tip of the week for this week is to buy modelling magazines. Some have excellent references to other people's models and tips and tricks that even I wouldn't think of. The only problem is that sometimes the cost of subscription can be more than the everyday modeller can afford.

Sunday, May 11, 2008

Tip of the Week

Don't hole yourself up in your garage and build models forever. Spend some time with your mom for Mother's Day and tell her how much you care about her.

Sunday, May 4, 2008

Tip of the Week

Buy lots of models at a time. It will let you get a variety of models in a short period of time.

Sunday, April 27, 2008

Tip of the Week

Why bother buying the expensive sprue cutters when you can just use copper wire cutters? They're cheaper, easier to find, and they work just the same! Just ask for them at your local hardware store.

Sunday, April 20, 2008

Tip of the Week

Make dioramas for armour models. It really makes your model stand out in the crowd, just like my new Pak 40! They take a bit of time and work so don't get discouraged, because it'll all be worth it in the end!

Sunday, April 13, 2008

We are Undergoing Changes...

Well, the title says it all, we're undergoing major changes. First of all, I'm getting rid of the theme of the month sections because, well, I can't be bothered to think up a tip that goes along with the theme. It's actually hard work to operate a website in your spare time. I'll continue to put out tips every Sunday (or asap) and reviews at the end of most months. I hope you'll understand. I'm also excited about some future reviews, because I just got a Tamiya 1/35 Tiger I (YES!!) and also I made a Pak 40 Diorama (look for pictures in the near future).

Yes we're still going strong!!

Saturday, April 5, 2008

An Officer's Story: Airfix British 8th Army Review; Pt.3


The next thing that I did was paint on the accessories, such as the pistol, the pouches, the hat, etc. For the hat I painted it a light tan on the top, a dark tan on the front, the brim black, and I added a little gold insignia. I painted the pouches a dark tan and the pistol grey. At that I had finished the officer.

Wednesday, April 2, 2008

An Officer's Story: Airfix British 8th Army Review; Pt.2


The next thing that I did was paint the flesh. I painted the flesh first because then I wouldn't have to paint around the uniform. I painted the face and the arms and legs with little paint so that a fair amount of detail could be seen. I then painted all of the uniform and hat a light tan. I painted over all of the other parts because I would paint over them.

Sunday, March 30, 2008

An Officer's Story: Airfix British 8th Army Review; Pt.1


With March coming to a close, I'm going to go throught the steps that I went through to finish the officer from Airfix's 1/72 scale British 8th Army kit. I bought this kit last summer and really didn't get around to making it until now. When I first opened the box, the first thing I noticed was the quality of the kit. The figures are some of the best that I've ever seen. The molding was almot perfect with only a few lines and minimal flash. As I was looking throught the sprues one figure caught my eye. That figure was an officer that had no mold lines and looked better than the rest. When I looked at him I knew that he was the best figure in the kit. After a couple of weeks the box was put somewheres and was almost forgotten until a few weeks ago I took it out, having finished my last kit, the Tamiya Pak 40, (look for the pictures, coming soon) and sprayed the figures. Then they were ready for painting. The officer is shown in the picture with the Airfix Panzer IV

Sunday, March 23, 2008

Tip of the Week

For the last tip of the week for figures, I decided to use a tip that may seem obvious to some, but to others, this may be a lifesaver. Use any form of magnification to see your work better. With the help of a pair of magnifying glasses, you can see detail that you never have even seen with the naked eye.

Sunday, March 16, 2008

Tip of the Week

Use reference sources. Before you go ahead and paint those awesome new figures that you bought, you should try and find a picture or something to base your color scheme after. I suggest Google Images searches or go the old fashioned way and go to your local library where you could find a book on the topic. Note: books with color photos are best for obvious reasons.

Sunday, March 9, 2008

Tip of the Week

Paint your figure as you would dress them. Well, if you don't get what I mean by that, I mean to paint flesh first, then the uniform, and last any accessories that come with it, like pouches and guns. This will guarantee an excellent looking model every time.

Friday, March 7, 2008

This Month's Theme Is...

Figures. I sincerely apologize to my avid readers, [If there are any=)] about being so late into March for the new theme to start. The Panther review took a little longer than suspected, but it was my first review so it was a learning curve for me. Anyways, back to the theme. Figures can be the most difficult form of models to finish, but if you do the proper steps and do some other things, the result is extremely satisfying, but one thing to remember is that the smaller that you go, the less detail you get from painting.

Tamiya Panther Ausf. A Build; Part 6


Today I'll talk about painting and finishing the Panther. I have left off the tool racks, tracks, and all other accessories that go on the sides. I painted it in three parts: chassis, body, and turret. After masking off the figures I airbrushed on Decoart Tan on all the parts.c Then I free handed the camouflage using Decoart Burnt Sienna and Hunter Green. After the paint dried I added a Decoart gloss coat. Then I painted all tool and accessories. I also gave the tracks a dry brushing of Decoart Burnt Umber. After this was finished I used a bit more of the same brown form the tracks on the tools, body bottom edges, and wheels. Then I added the decals, Which are beautiful with lots of options(I chose Totenkopf division) Then I used Tamiya's weathering master tool powders to blend in the decals a bit and a a bit of roughness to the model. And there you have it, a great tank that looks straight from the battle.

Monday, March 3, 2008

Tamiya Panther Ausf. A Build; Part 5


Today I'll talk about the chassis of the Panther. This is two pieces(the main bottom and the back) with wheels separate. The wheels are nicely molded with very little clean-up to do. Make sure you put these on in the right order or you'll have a big problem. This is monotonous but be patient it looks great when it's done. The rear of the tank has some exhaust pipes and the jack and these are mediocre, not perfect but they'll do. That's all for the chassis, next post will be painting.

Sunday, March 2, 2008

Tamiya Panther Ausf. A Build; Part 4


Today I will talk about The hull of the tank. This was one piece with tools and handles that had to be glued. All the pieces went on fine and there is very little to say about this stage. The handles near the engine grates are tricky but be patient. This was the quickest part to finish. I left the tools off until after painting.

Wednesday, February 27, 2008

Tamiya Panther Ausf. A Build; Part 3


Today I'll talk about the figures for the tank. This kit includes a commander and driver. The driver comes in 4 parts(body&head,arms,legs) and the commander comes in 3(body&head, arms) These are both molded well with minimal flash and great detail. The fit of the parts is excellent and the construction is fast. Make sure the commander's arms are postioned right or he won't stand straight. I painted them using mostly Decoart crafters acrylics. These are cheap and you can find them almost anywheres (even at Wal-Mart) I painted the uniforms using a mix of black,navy blue, and grey. The faces were one coat of flesh. The boots and gloves were black with a gloss painted over them. After the main coat had dried I highlighted the inlaid detail with lines of black. Tomorrow we'll talk about the hull.

Tuesday, February 26, 2008

Tamiya Panther Ausf. A Build; Part 2


When you open the box you see, well, a lot of plastic pieces, about 150 of them. These are well molded and with very few marks to speak of. The instructions say to build the chassis first but I left that for last.The turret is made up of basically two parts, The gun and mantlet and the turret body. The gun goes together nicely with a little filler on the seam. The mantlet fits perfectly on the turret and is moveable.After attaching the main parts I noticed the back of the turret had two large ruts. A little bit of filler will do to fix those. I then added the details, hatches, spare track holders, etc. The turret looked great, with the right texture and fit.

Sunday, February 24, 2008

Tamiya Panther Ausf. A Build; Part 1
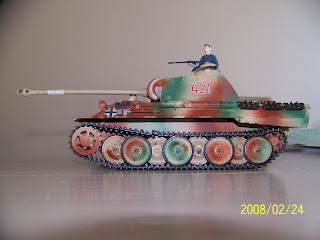

Well, as February comes to a close, I've decided to do a tank build/review. Luckily, shortly before I made this decision, I finished the Tamiya Late Panther Ausf. A (Kit #35065). As I built some of it before the website went up, I won't be able to show it as it is being built, but I do have finished photos up.

Sunday, February 17, 2008

Tip of the Week

Tanks were not clean machines. They threw up lots of dirt and mud that splattered all over them. So when building a tank weather, weather, weather.

Sunday, February 10, 2008

Tip of the Week

Most instructions say to build the wheels on tank first, but the wheels are boring, tedious and hard. Always do them last to avoid frustration. Wouldn't you rather see a turret with a big gun build before your eyes or just alot of circles? I would pick the turret, and I bet most other people would to.

Sunday, February 3, 2008

Tip of the Week

Use figures whenever the kit supplies them. It adds a sense of scale and a bit of character, plus they're really fun to paint!

Saturday, February 2, 2008

This Month's Theme is...

The theme for the month of February is Tanks. You've all seen them. You've all looked in awe at the enormous gun on the front of them. You've all wanted to build one. Most of you have. Tanks are some of the most popular model themes and there are lots of excellent kits out there. The only problem about armour models is the price. If you want a really awesome and realistic armour kit with photo etched pieces and the whole nine yards, expect to lay down about $50-$70. This makes it difficult to buy good medium to large scale armour kits. Actually, if you want a fair amount of detail or realism at a good price, I reccomend buying small. By small I mean 1/72 scale tanks, and I have to reccomed Airfix for their quality, quantity and some interesting tank designs such as the Churchill Crocodile Tank and the Sherman Crab tank, with more on the way this year like the Matilda Hedgehog, the Sherman Calliope, and the Churchill bridge layer.


Friday, February 1, 2008

Welcome!

Welcome to Zaltar's Guide to Scale Modelling! Are you tired of those rich European modellers saying, "OOOOHHHH! Look at me I'm painting details rivaling the real life inspiration," or "OOOOHHHH!Look at my $50 paints" Well I am too. The reason behind this blog is to show us average Joe modellers that they can make good models without breaking their banks. Every month I will give you a new tip for modelling and every so often I'll show pictures of mine.

Keep posted and please try not to throw out your models when you're pissed because it doesn't look like an expert's version.